
Using an external modem with the Satcube Ku
Setup and configuration guide
- To use an external modem with the Satcube terminal, the modem should first be connected to the external interface on the back side of the antenna. The connectors are found underneath a black plastic cover in the top right seen in figure 1. There are two SMA connectors behind the plastic cover, one Rx and one Tx port as seen in figure 2. This is an L-band interface. A Torx T10 screwdriver should be used to unscrew the lid.
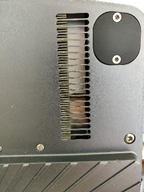

Figure 1 shows the plastic cover on the backside of the antenna on the left. On the right are the SMA connectors underneath the cover.
- Connect the external modem to one of the ethernet ports on the Satcube with an ethernet cable.
- In the terminal web GUI, to route the outside Tx connector to the BUC, the Transmission source should be set to External, as seen in Figure 2. Rx is always active and can be used, for example, a spectrum analyzer without changing any settings.

Figure 2 shows the terminal GUI with red arrows indicating settings that should be changed.
- If OpenAMIP is to be used on the external modem, please make sure the modem is set to 192.168.222.222/29 and points to 192.168.222.219/29. Also, make sure to either change the IP address of the internal modem to something other than 192.168.222.222 or set the Internal modem to Powered off, as seen in figure 3 to avoid IP traffic issues. Please note: After a terminal reboot, the Modem power is automatically set to ON again.
- As the last step, add satellite preset / frequency information in the GUI as normal to enable pointing if you are not using OpenAMIP.

Figure 3. Satcube GUI settings for an external modem.
Comments
0 comments
Please sign in to leave a comment.